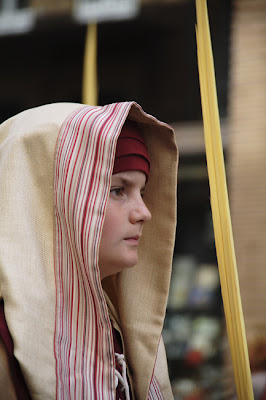
magnetic loop, say the books, can be used to select and remove objects from sharp edges, can nevertheless a good result with other objects ,..... I think.
also serves to select areas of an image and treat them independently. Scored the first option here.
The picture is done in RAW and process with the specific program in advance of the brand, Canon, I recognize that for many photos I hes easier than Photoshop.
The steps that follow are:
Duplicate original layer twice and off the base layer. Fails with the name "base copy" the first and second renamed as "work."
This is for safety, simply, but perhaps too, because you can always double the base if not has done nothing.
The second layer of copying, labor, high-contrast curves applied to mark the edges but, I have the up to 25% white and black alike, but this is to the eye.
can select by location, the girl and the palm, so if something is wrong in either area can be repeated. Selected with a draft of "0" pixel, and each in its time.
begin with the girl, the minimum zoom to select is 300 and yet when I finish the selection edge is not perfect, I keep a alpha channel with this selection that he named "girl pixel 0"
is "off" the working layer and select the layer "base back."
In the layer "base copy" by the alpha channel selection created "girl pixel 0", so I'm in the previous step to the edge is not smooth, step to the mask option Fast pressing "q" on your keyboard, or click on the Tools icon on Quick Mask.
With the quick mask on, to soften the edge, I apply a Gaussian blur in this photo I needed 6 pixel, the more indefinite the edge is most needed and do not think we should reach this amount, As for me that these photos must be another solution. It gets to keep the smooth selection, I have not heard directly change the name on the alpha channel that has been generated automatically so I have doubled the channel and in that I've renamed. It was renamed as "smooth girl"
think I have softened the selection a new layer from it.
Layer> New> Via Copy
is generated automatically and put the first of the layers, turn off the layer FODO copy "and the new asset created, renamed as" girl. "
In this layer, by the selection from alpha channel "smooth girl" I invert the selection, this means that only the bottom is selected without any pixel layer "girl" and blur the edge proviniente.
As before, I create a new layer from selection I have, Layer> New> Via Copy, and I call girl edge.
I put it in blending mode "multiply" to obscure the edge to try to avoid halos.
As I see it if you have them or not, I create a new layer.
Layer> New> Layer to create
The background I used, and as he has given blacks, the boat filled with pure black paint, "R = 0, G = 0, B = 0. " Given that the First, it obscures the whole picture, the low from behind the "girl" and "edge" the first selection appeared in principle perishes not have been too bad. I call this layer "black background."
repeat the extraction process with the "hand" from the layer "background work" and "Background copy", previously off the "girl", "edge of girl" and "FODO black.
When finished, upload the new two-layer "palm" and "Palma edge" over those "black background", "girl" and "girl edge, activating all the new layers and starting off, photo not too bad, but needs a profile of halos.
it is assumed that the edge would not be necessary, but it is, so I think as a new layer above Layer> New> Layer to create, and renamed "painting", and this is not they say in any book because they use appropriate pictures for everything and also they know.
This new layer, paint the background color, with a zoom of 300% and with a fine brush on 6 pixel I see that bothers me and it produces halo, and when I'm wrong, this same layer with the same zoom and delete brush size with the rubber.
I painted with an opacity of 25 % Because sometimes I need a single pass and other more and more the effect is so slow and I can be watching.
I forgot an option also with the quick mask to extend and retract the selections that would have made unnecessary quuizas reprofiling, a latazo but this does not prove with this picture, I leave for another day.
The photo has not been quite right, the palm can be better, could repeat the process, but I do not want, so what I do is in the final focus of the photo, blur the palm and I think improvement.
leave the two photos, the starting and final.

This is a summary of what Katin Eismann explains in his book, Mascara and assemblies with Photoshop, edited by Anaya.